Products
Quality Properties
Tension Test
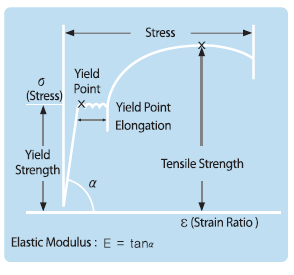
A tension test is a basic testing method to measure the yield point, the tensile strength and the elongation of a steel sheet. In case of a usual tension test, some load is increased until the test piece is broken while some load is added to a fixed test piece.
Test Piece
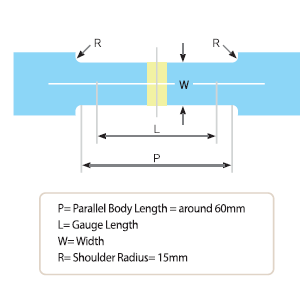
The kind and sizes, etc. of testpieces are specified in all of the specifications, such as KS, JIS and ASTM, etc. in order for you to prepare for a test piece to be used for a tension test. In case of a cold-rolled stell sheet, a way of selecting a test piece, which is specified in KS B 0801 No.5, is generally used.
Results from a Tension Test
The results from a tension test are used as the most basic standards to judge the workability and formability.
Elongation (EI)
Higher the elongation is, better the formability.
Yield Point (YP)
Lower the elongation is, better the formability.
Yield Ratio =Yield point / Tensile Strength, YR
Lower the yield ratio, wider the gap between the yield point and the tensile strength, and wider the gap is, better the shape freezing property of steel sheet is, when it is processed at the same strength level.
Elastic Modules (E)
An elastic modulus is inversely proportional to the inverse elasticity of a steel sheet. Lower the inverse elasticity, better the shape of a final product.
Work Hardening Exponent (n)
When some stress is put onto materials, a deformed part becomes hard in order for it to be constrained not to be deformed more and the force of deformation is for it to be constrained not be deformed mor and the force of deformation is spread to the other un-deformed more and the force of deformation is spread to the other un-deformed parts in order for the whole parts of a material to be deformed evenly. Since bigger the hardening exponent, quicker and evener the spread of deformation, such kind of material considered as the one with a good formability.
Plastic Deformation Factor (r)
In wo/w / In to/t (/wi, w=width before and after a test, and to,t=thickness before and after)
The reduction ratio of the part in the thickness-wise direction is inversely proportional to the value, r, and the reduction ratio of the part in the width-wise direction is proportional to the value r. and bigger the value, r, the harder a steel sheet is cracked and the easier the steel sheet is worked.
Coating Weight/Adhesiveness Tests (GA/GI)
The coating weight and adhesiveness tests are done after sampling some test pieces from the top and bottom of each coil.
Coating Weight (GA/GI)
It is judged with the average value calculated by measuring the coating weights on the back side of three areas width wise, by using an X-ray dry analysis method.
Adhesiveness (GA/GI)
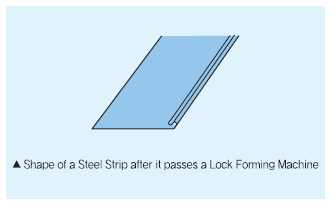
After conducting a lock forming test, the plated status of the deformed area should be checked with the naked eye.
Flaking Test (GA)
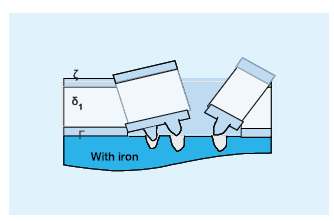
There are layers after zinc coating; due to the shearing stress, the layers get distured. Too much alloy too much shearing stress. If the detachment is more from gamma layer, it is called flaking. Behavior of material when subjected to the shearing stress is known as flaking.
Powdering Test (GA)
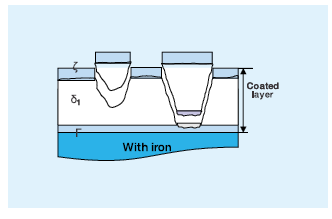
There are layers after zinc coating; due to the compressive stress, the layers get disturbed. Too much alloy too much compressive stress. If the detachment is more from Delta layer, it is called powdering. Behavior of material when subjected to the compressive stress is known as powdering.
